
Burpees have a reputation for wrecking knees, wrists and lower backs — but the exercise is rarely the villain. Nine times out of ten, the pain comes from sloppy technique, a cold start, or doing too much too soon. Fix those three things and burpees become one of the safest, most effective full-body moves you can do anywhere.
This is your no-nonsense guide to pain-free burpees: why they hurt, how to move cleanly from start to finish, the mistakes to avoid, and smart ways to modify if your joints are sensitive.
Why burpees hurt (and it’s usually not the burpee)
The movement itself is natural: a squat, a plank, a jump. Pain shows up when your form breaks down — usually under fatigue or speed. A rounded lower back on the way down, hips that sag in the plank, flat wrists crashing into the floor, hard heel-first landings. Add a skipped warm-up and too many reps too fast, and small stresses quietly turn into real aches. The good news: every one of those is fixable.
Warm up first — always
Cold muscles and joints strain far more easily. A short warm-up raises your body temperature and preps the wrists, shoulders, hips and knees that burpees rely on — which lowers your injury risk and makes every rep smoother (NHS). Two to three minutes of easy movement is enough: arm circles, hip openers, a few slow bodyweight squats, and gentle wrist rolls to get your wrists ready for load.
The pain-free burpee, step by step
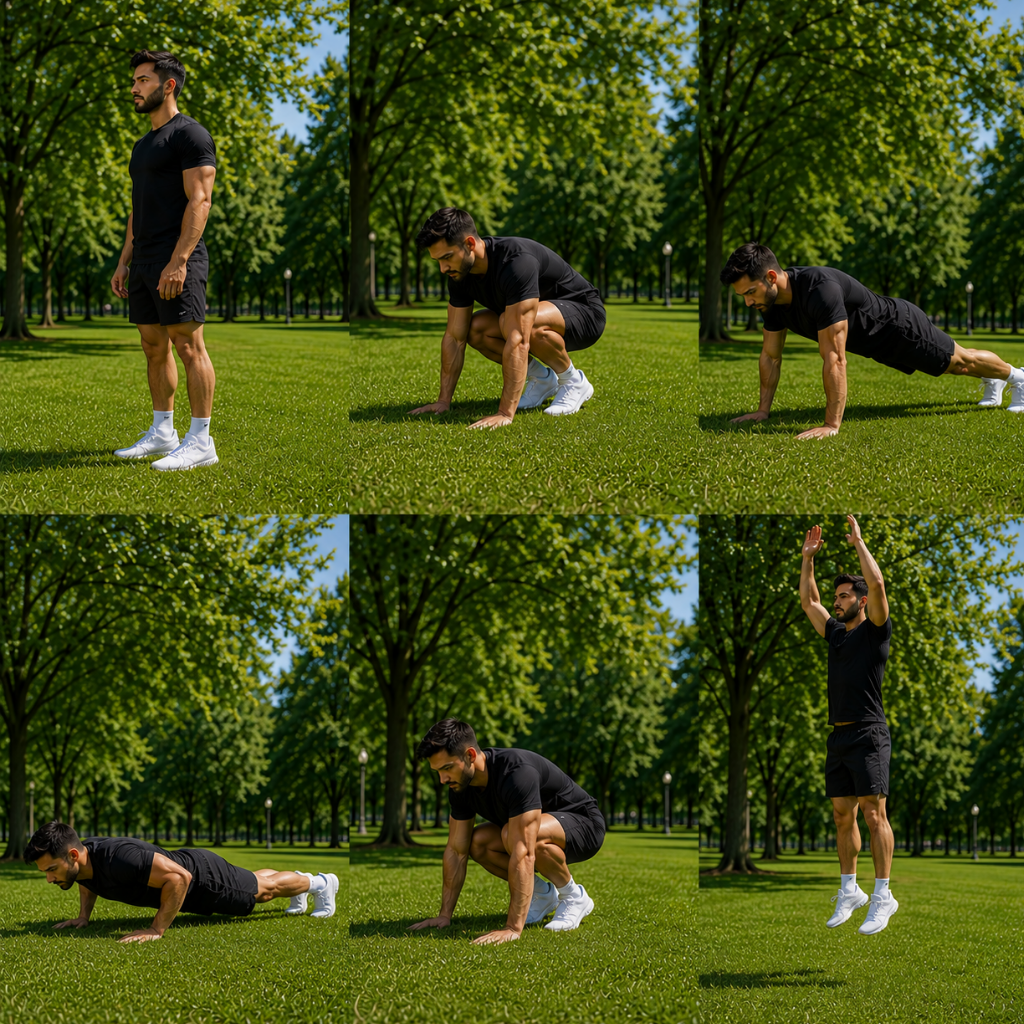
- Brace and hinge down. Feet hip-width, brace your core, then hinge at the hips and bend your knees to lower your hands — don’t round your lower back to reach the floor.
- Hands under your shoulders. Place them directly beneath your shoulders, not far out in front — reaching forward loads the wrists. Spread your fingers to share the pressure.
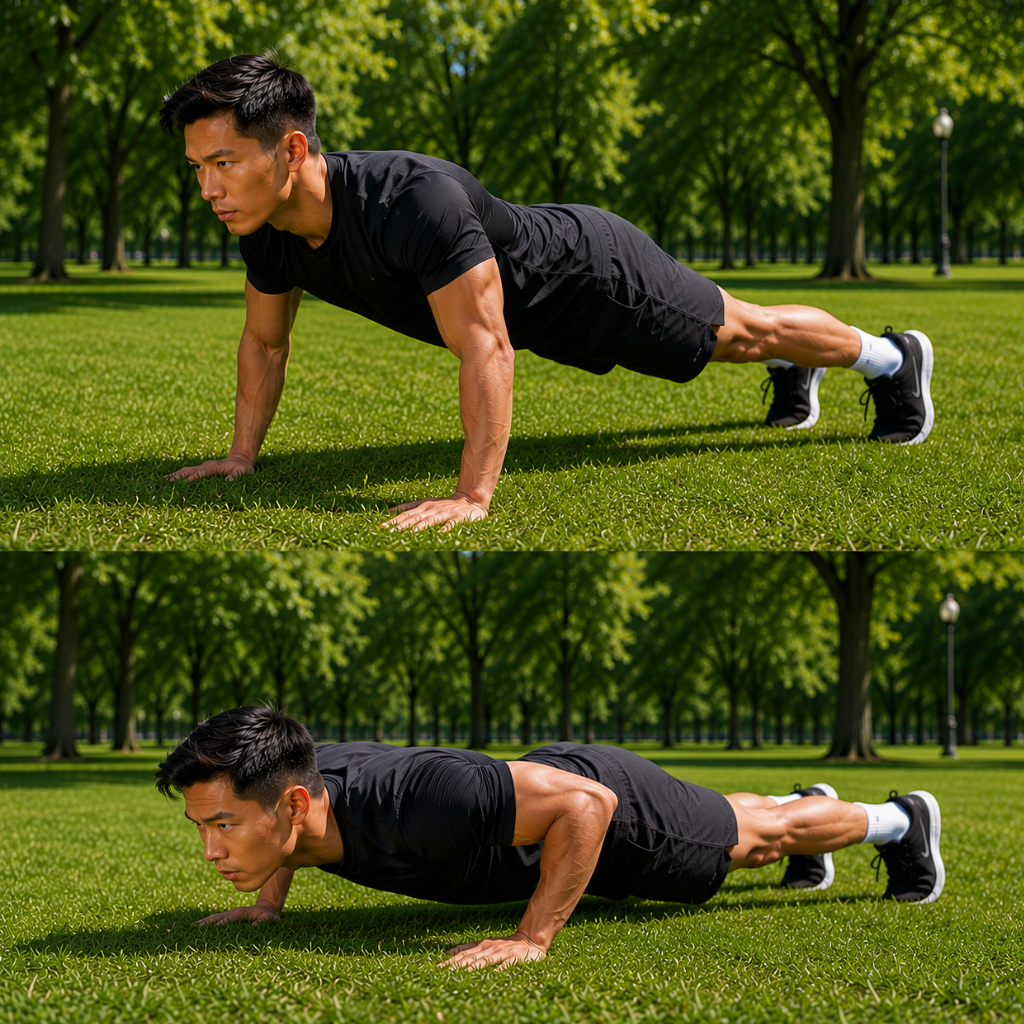
- Step or jump to a solid plank. Body in one straight line, ribs down, core and glutes engaged so your hips don’t sag. If your hips drop, take a slightly wider stance.
- Optional push-up. Lower under control with elbows close to your body, keeping a full-body line — no sagging, no piking.
- Return and rise. Bring your feet back under your hips, then stand or add a jump — landing softly on the balls of your feet with knees tracking over your toes. Never crash down onto locked legs.
New to the movement itself? Start with our full guide on how to do burpees with good form, then come back for the fine-tuning.
Common mistakes that cause pain
- Rounding the lower back on the way down → hinge at the hips instead.
- Sagging hips in the plank → brace your core and widen your stance.
- Flat, crashing wrists → hands under your shoulders, fingers spread, or make fists to keep your wrists neutral.
- Hard heel-first landings → land soft on the balls of your feet, knees bent.
- Going too fast → speed is the enemy of form. Slow down to stay clean.
- Too many, too soon → build volume gradually. Aches that linger are a signal, not a badge of honour (ACSM, 2015).
Sensitive wrists, knees or back? Modify, don’t push through
You never have to muscle through pain. Swap the jump-back for a controlled step-back, drop to knee push-ups or skip the push-up entirely, and stand up instead of jumping. For sore wrists, make fists to keep them neutral, or place your hands on a raised surface like a bench or step — incline burpees keep almost all of the conditioning benefit with far less joint stress. These aren’t lesser burpees; they’re the smart version for your body today.
Move well, not just hard.
GreenReps guides you through short bodyweight workouts — from 10 to 60 minutes, whatever your day allows. No gym, no equipment. Just press start.
Build up — don’t burn out
Even perfect form can’t protect you from doing too much too soon. Add reps and intensity gradually, keep some days lighter, and take a real rest day when your body asks for one. Pain that lingers beyond normal muscle soreness means back off — smart, sustainable training is exactly what keeps you consistent. If you like training often, read our honest take on doing HIIT every day and how to manage recovery.
In short
- Burpee pain is almost always technique, a cold start, or too much too soon — not the exercise.
- Warm up for 2–3 minutes first.
- Hinge (don’t round), hands under your shoulders, braced plank, soft landings.
- Modify for sensitive joints instead of pushing through pain.
- Build volume gradually and respect recovery.
Ready to put clean, pain-free reps on repeat? A 30-day challenge is a simple way to groove the habit — one good rep at a time.
Frequently asked questions
Usually because your spine rounds on the way down or your hips sag in the plank. Hinge at your hips instead of rounding your back, and brace your core so your hips stay level in the plank. If the ache persists, use the step-back version, skip the push-up, and build up slowly.
Place your hands directly under your shoulders rather than reaching forward, and spread your fingers to share the load. If your wrists are still sensitive, make fists to keep them neutral, or do incline burpees with your hands on a bench or step — both cut wrist stress significantly.
Not with good landings. Land softly on the balls of your feet with your knees bent and tracking over your toes — never onto locked legs or hard on your heels. If your knees are sensitive, use the no-jump version and simply step back and stand up instead of jumping.
Yes. Cold muscles and joints strain more easily, and burpees demand a lot from your wrists, shoulders, hips and knees at once. Two to three minutes of easy movement to raise your temperature and loosen those joints makes burpees noticeably safer and smoother.
Step back instead of jumping, drop to knee push-ups or skip the push-up, and stand up rather than adding a jump. You keep most of the full-body benefit with far less impact — an ideal way to start out or to train around sensitive joints.