
Pike push-ups are the closest thing to an overhead press you can do with nothing but a patch of ground. You push a big share of your own body weight straight up through your shoulders, which is why they build the front of your shoulders and your triceps like no other no-equipment move. Done right, they are also the most direct road to a handstand push-up.
The catch: pike push-ups are easy to do badly. Flared elbows, a sagging hip or a head that drops straight down between the hands turn a great shoulder exercise into a shoulder problem. In this guide you get the clean movement step by step, the six mistakes almost everyone makes, and a seven-step progression from your first rep to the wall.
What muscles do pike push-ups work?
A pike push-up is a vertical pressing pattern. With your hips high and your torso pointing down, the push happens overhead, not in front of you like a regular push-up. That shifts the work:
- Front deltoids — the main driver, and the muscle that gives your shoulders that rounded cap in a T-shirt
- Triceps — the lockout at the top, and about two thirds of your upper-arm size
- Upper trapezius and serratus anterior — they rotate the shoulder blades upward and keep the joint stable at the top
- Side deltoids — assisting, and more involved the more vertical you get (feet elevated, wall handstand)
- Core and glutes — isometric work to hold the pike position, plus a hamstring and calf stretch on every rep
Your hands carry roughly two thirds of your body weight in the floor version, about 77 percent with your feet knee-high and close to 100 percent in a handstand push-up. That is why this exercise scales so well: the load is already there, you just change the angle.
Does body-weight pressing actually build muscle? Yes. An eight-week study comparing push-ups with the bench press at matched load found the same growth in chest and triceps. A large meta-analysis by Schoenfeld and colleagues showed that lighter loads taken close to failure grow muscle just as well as heavy ones. Pike push-ups put most people in the 8 to 20 rep range — exactly that window, as long as you leave only one to three reps in the tank.
How to do a pike push-up step by step
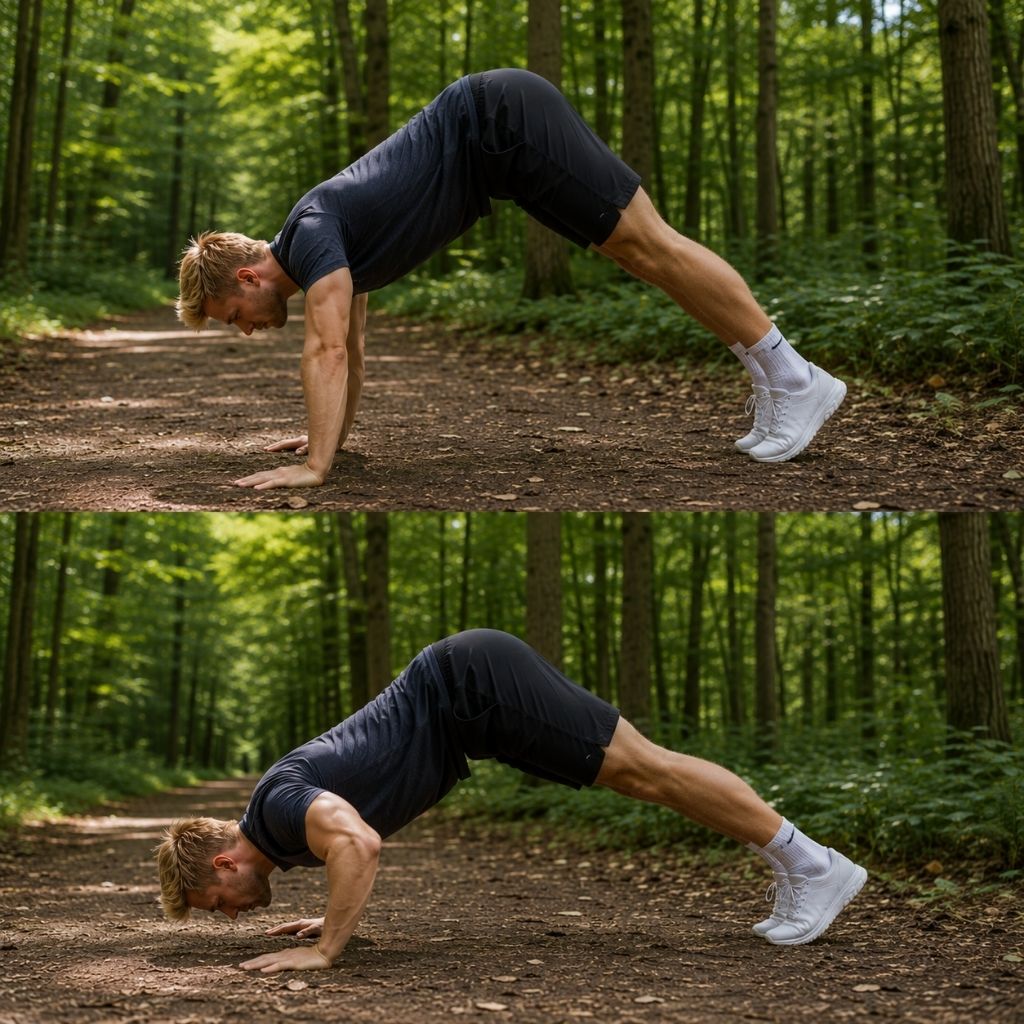
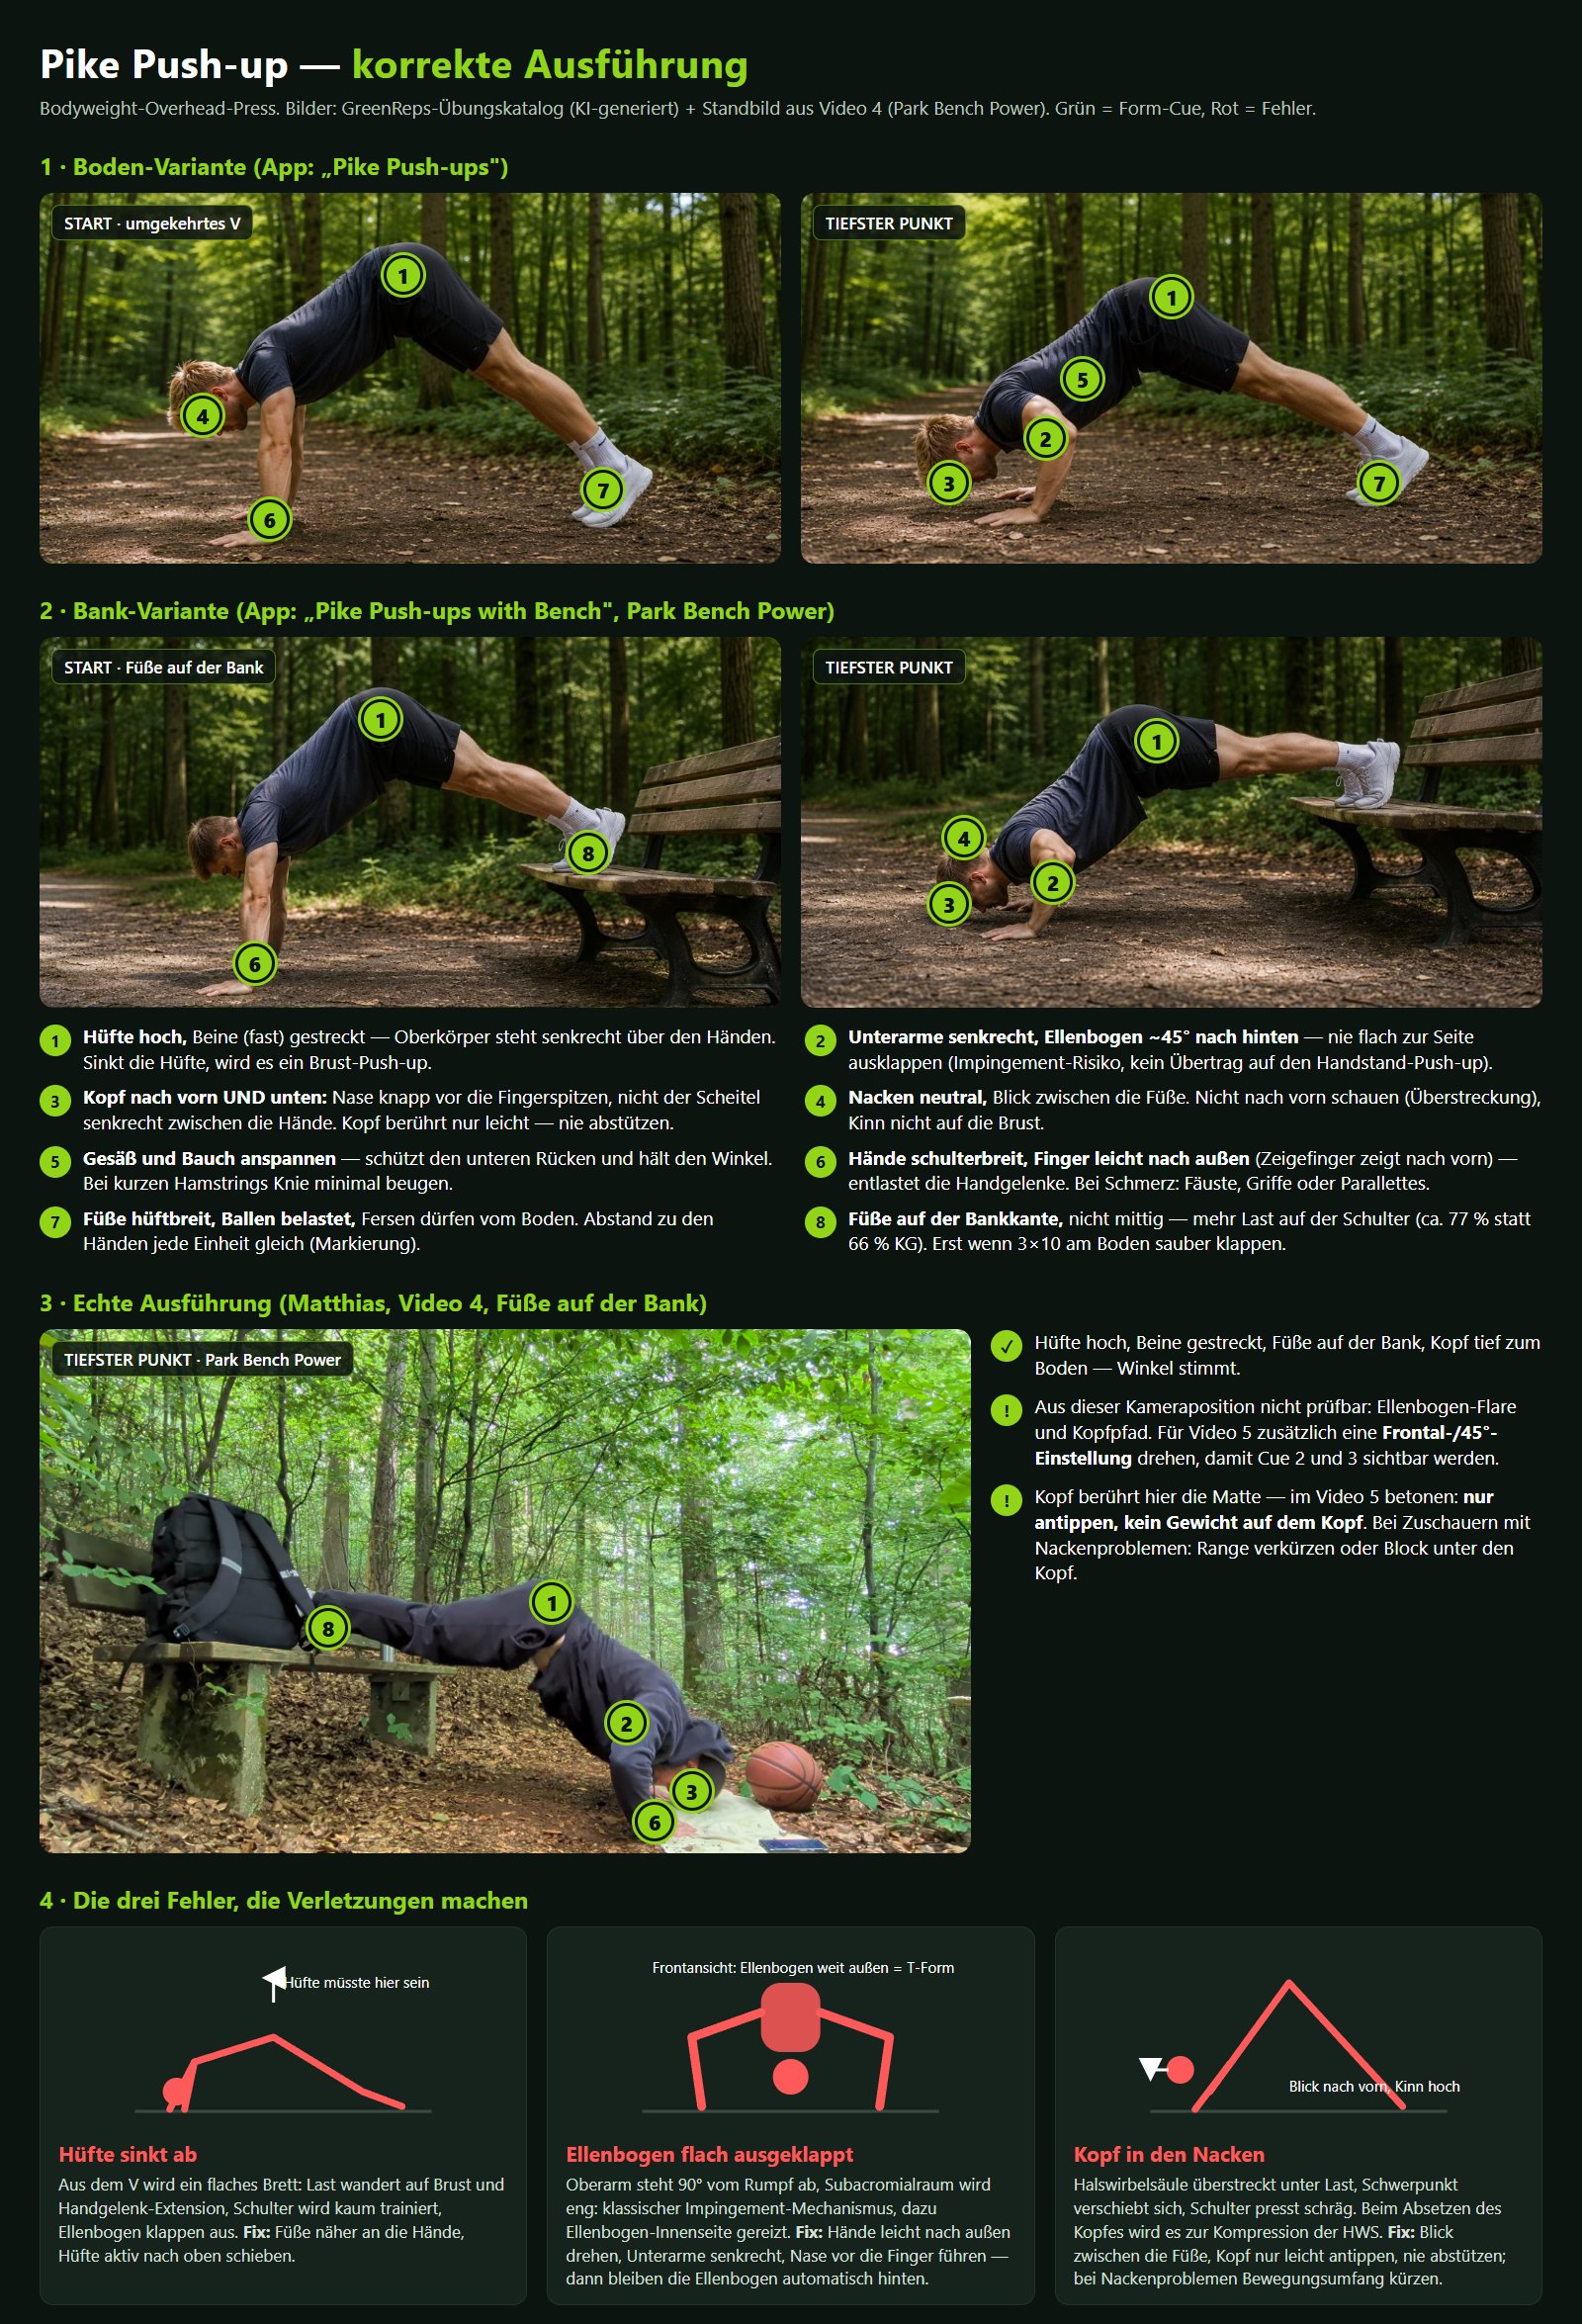
- Set up: Hands shoulder-width apart, fingers turned slightly outward so your index fingers point forward. Feet hip-width. Walk your feet toward your hands until your body forms an upside-down V. Heels can be off the floor.
- Brace: Squeeze your glutes and tighten your core. Look between your hands, neck long — do not crane your head up.
- Lower (2–3 seconds): Bend your elbows and keep your forearms vertical. Elbows travel back and slightly out at about 45 degrees, never flat to the sides. Your head moves forward and down so your nose lands just in front of your fingertips.
- Pause: A brief stop at the bottom. No bouncing off the floor.
- Press: Push the floor away, back into the V, and lock out fully. At the top, actively push your shoulder blades up — ears away from your shoulders. Exhale on the way up, inhale on the way down.
- Stay consistent: Same hand and foot distance every session (mark the floor if you can). Otherwise your reps are not comparable and you cannot track progress.
Pike push-ups, already in your plan.
GreenReps guides you through short bodyweight workouts — from 10 to 60 minutes, whatever your day allows. No gym, no equipment. Just press start.
The 6 most common pike push-up mistakes
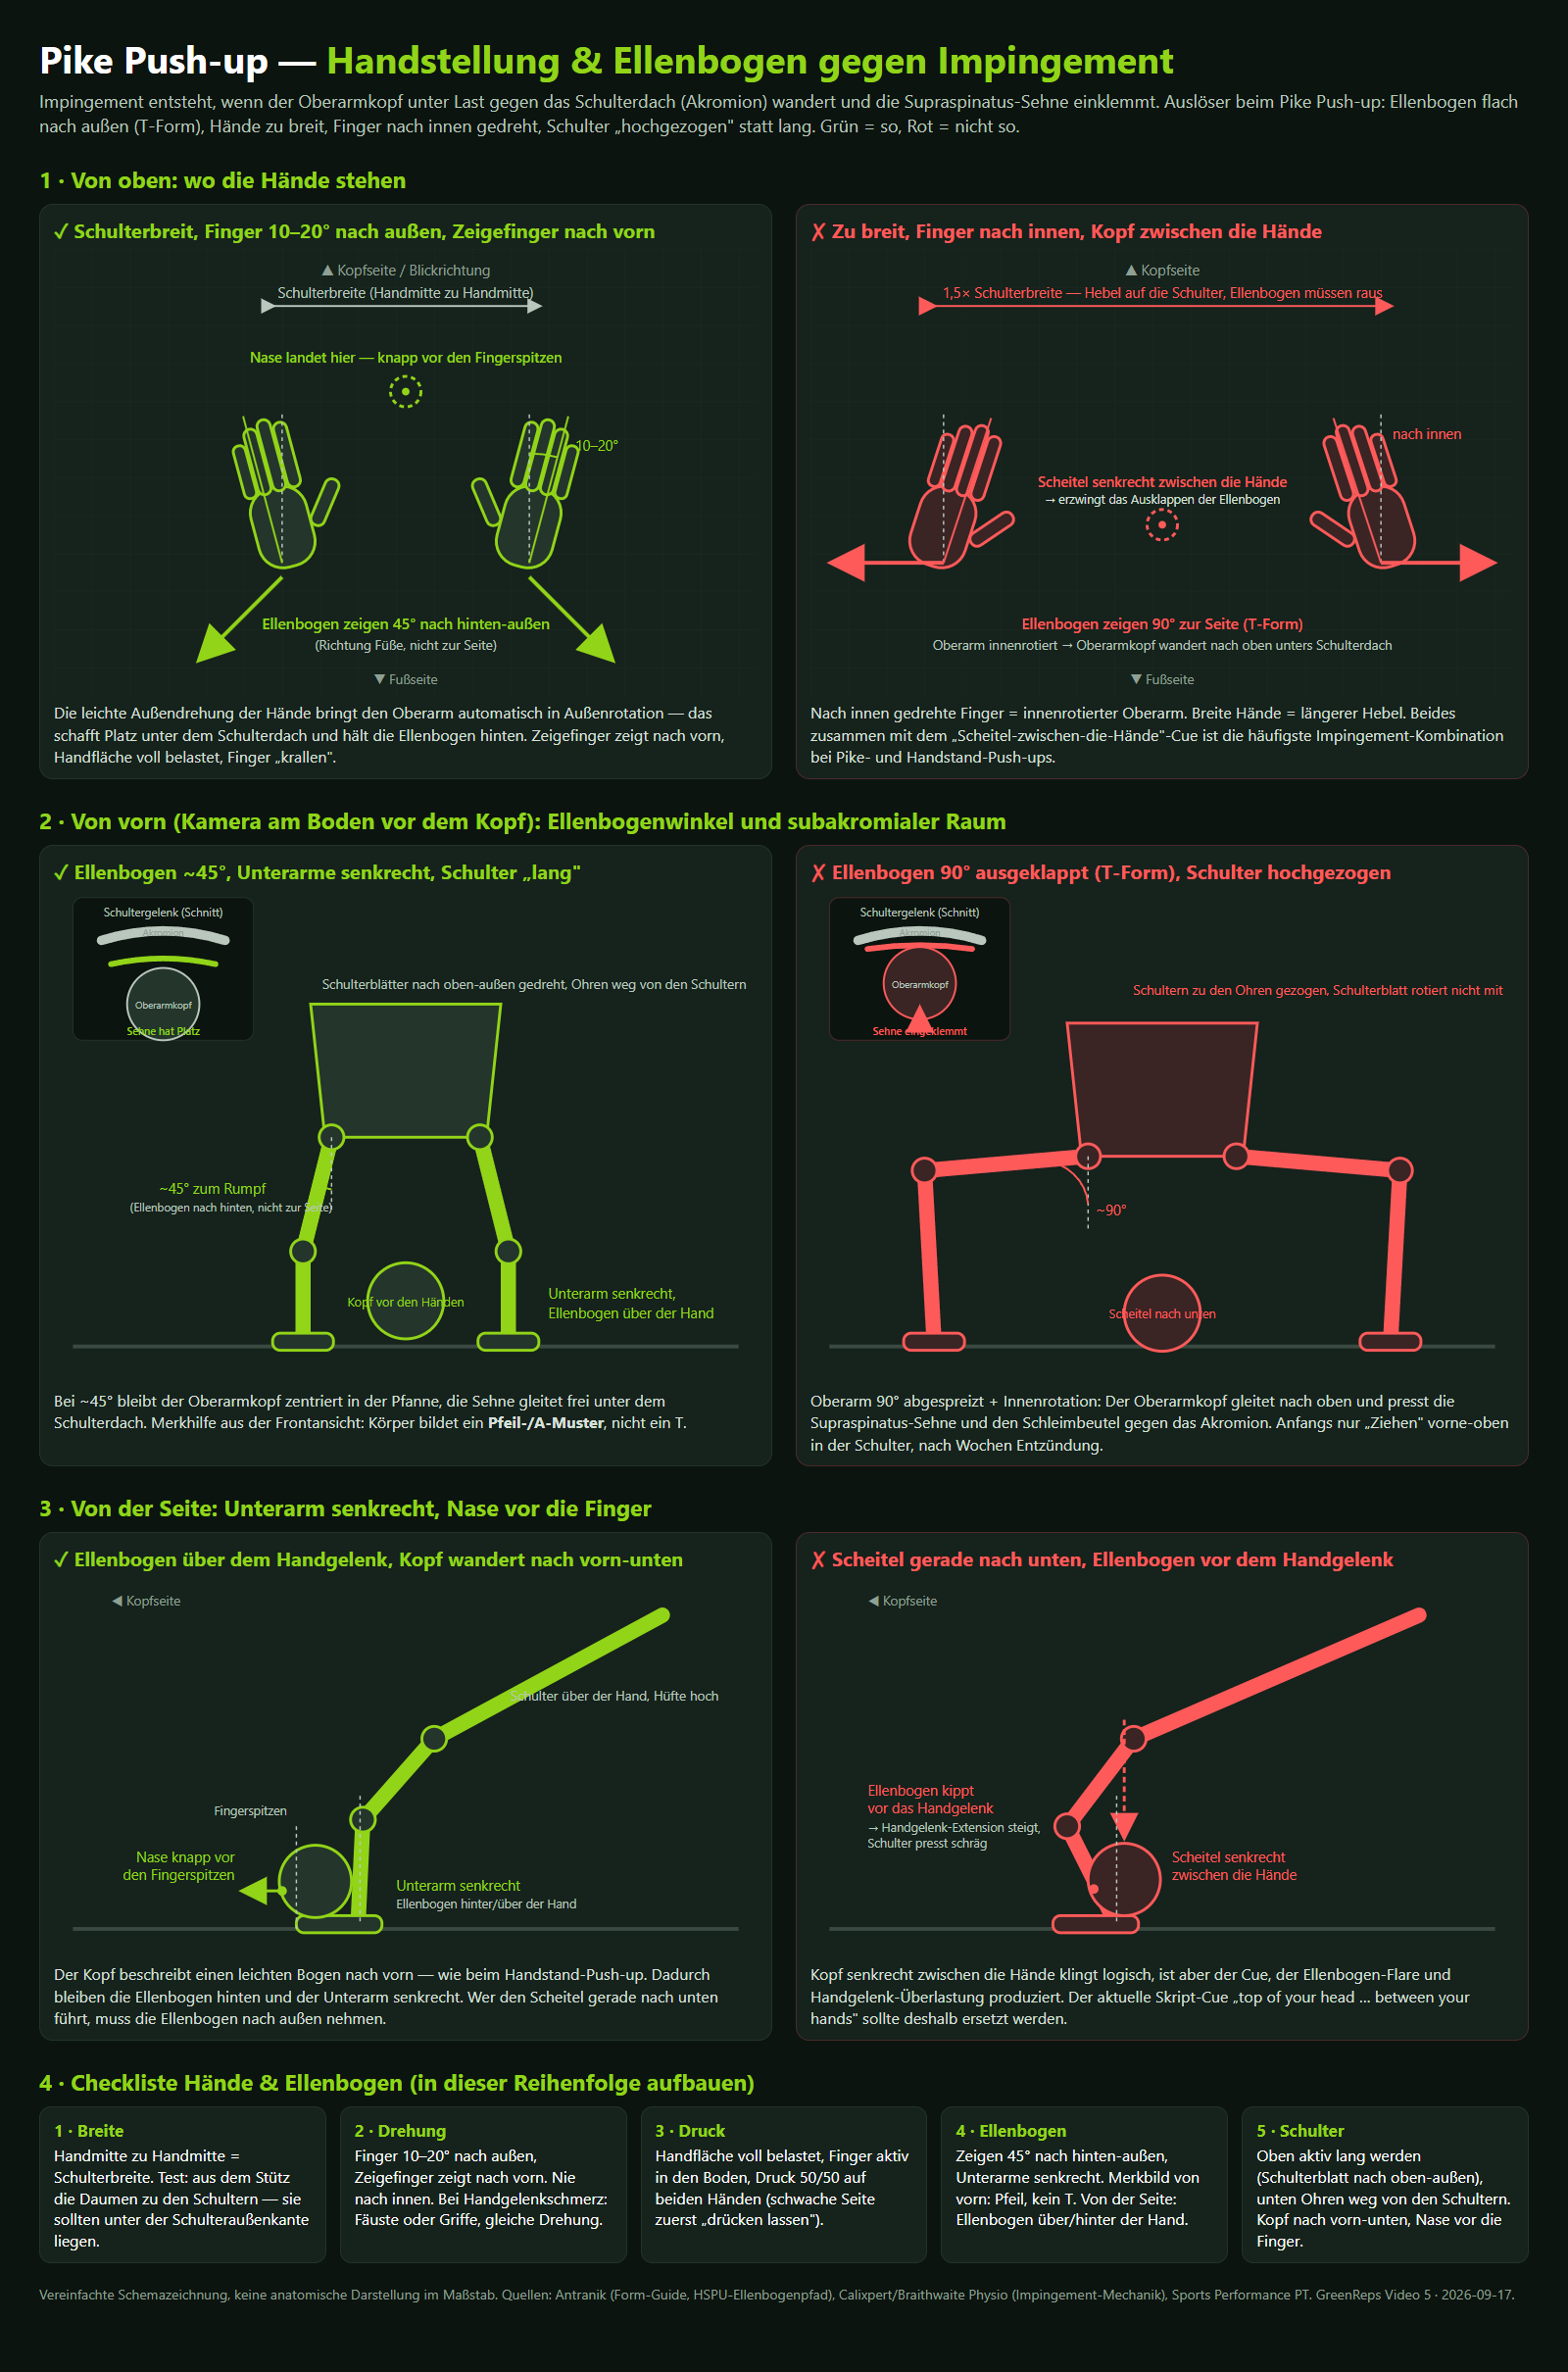
- Elbows flared out to the sides. The classic T-shape. It stresses the shoulder joint, raises the risk of impingement and does not carry over to handstand push-ups. Fix: forearms vertical, hands turned slightly out, elbows at roughly 45 degrees.
- Head dropping straight down between the hands. Sounds logical, but it forces the elbows out and shortens the range. Fix: move your head forward and down, aiming your nose at a spot just in front of your fingertips.
- Hips sinking. The angle flattens and the move quietly turns into a regular push-up. Fix: walk your feet closer and push your hips up.
- Half reps. Little stimulus, inflated numbers. Fix: nose to the floor, full lockout at the top. Fewer full reps beat more half ones.
- Looking forward. Cranking the neck loads the cervical spine. Fix: eyes between your feet, spine long.
- Bouncing and holding your breath. Joint stress and an early blood-pressure spike. Fix: 2–3 seconds down, a short pause, exhale as you press.
If you have ever read our guide to the ten burpee mistakes almost everyone makes, you will recognise the pattern: speed and ego are the enemies of clean reps.
Protect your shoulders: hand position and elbow path
Shoulder impingement happens when the head of the upper arm bone rides up under the shoulder roof (the acromion) and pinches the rotator cuff tendon. In the pike push-up, the trigger is almost always the same combination: hands too wide, fingers turned in, elbows flat to the sides and shoulders shrugged up to the ears.
The fix is built into the setup. Hands shoulder-width, fingers 10 to 20 degrees out, index fingers forward. That small outward turn rotates your upper arm outward, creates space under the shoulder roof and keeps your elbows tracking back instead of out. At the top of every rep, push your shoulder blades up and away from your ears. Seen from the front your body should look like an arrow, not a T.
Sharp pain at the front or top of the shoulder, or a painful click as you press up, is a stop signal. Make the variation easier or skip the exercise that day. A dull burn in your shoulders and triceps is normal — that is the work. If you already have a known shoulder issue, start with the hands-elevated version and a short range, and talk to a physio first.
Wrists complaining? The flat-hand position means almost 90 degrees of wrist extension under two thirds of your body weight. Push-up handles, parallettes, a pair of dumbbells or simply your fists keep the wrist straight while everything else stays the same.
Pike push-up progression: from the first rep to handstand push-ups
The pike push-up is not one exercise, it is a ladder. Each step moves your torso closer to vertical and puts more of your weight on your hands:
- Downward-dog hold with shoulder shrugs — about 46 percent of body weight. Move on at 3 × 30 seconds.
- Hands elevated on a step, curb or bench — under 66 percent. Move on at 3 × 8–10 clean reps.
- Floor pike push-up — 66 percent. Move on at 3 × 8–10 with your nose touching the floor.
- Feet knee-high on a chair or park bench — about 77 percent. Move on at 3 × 8–10.
- Feet hip-high on a table or wall — about 83 percent. Move on at 3 × 6–8.
- Feet elevated plus hands on parallettes or blocks for extra depth — about 85 percent. Move on at 3 × 5–8.
- Wall handstand push-up, chest to wall, negatives first — 100 percent. From here the free-standing handstand push-up is a balance problem, not a strength problem.
Two rules make the ladder work. Stay on a step for at least four to six weeks before raising your feet — tendons adapt more slowly than muscles. And increase range of motion first (nose lower, more depth), load second (feet higher). If a step is too hard, walk your feet away from your hands, bend your knees a little or shorten the range for a while.
In the GreenReps app you will find exactly two of these rungs: the floor pike push-up in THE ASCENT and the bench version in PARK BENCH POWER. Two steps are enough for most people for a year of progress. Not yet at step three? Build your base with regular push-ups first — our burpee form guide covers the push-up phase in detail.
How many pike push-ups should you do?
For strength and skill: 3–5 sets of 5–8 reps with two to three minutes rest, lowering for three seconds. For muscle: 3–4 sets of 8–12 reps with 90 seconds rest. In a circuit, aim for 10 quality reps per round and drop to an easier variation the moment your form goes. Twice a week is plenty. Whatever the format, pair every pushing session with a pulling exercise such as rows or pull-ups, otherwise your shoulders roll forward over time.
Community numbers suggest an intermediate man manages about 17 strict floor reps and an intermediate woman about 10. Take that with a grain of salt: most people count half reps with flared elbows. With strict form, single-digit numbers are normal at the start — and that is fine.
In short
- Pike push-ups are a body-weight overhead press: front delts, triceps, upper traps and serratus.
- Hands shoulder-width and slightly turned out, forearms vertical, elbows back at 45 degrees, nose in front of the fingers.
- Flared elbows and a head that drops straight down are the two mistakes that hurt shoulders.
- Progress by raising your feet, not by cheating the range. Four to six weeks per step.
- Twice a week, always paired with a pull.
Ready for your first set? Open GreenReps, start THE ASCENT and let the timer count while you focus on one thing: nose in front of the fingers.
Frequently asked questions
For the front deltoids and triceps, yes — the pressing pattern is the same and the load (two thirds of your body weight and up) is real. Two differences: a barbell or dumbbell press can be loaded more finely, and it works the side delts a little harder when you stand upright. In return, pike push-ups are a closed-chain movement: your hands stay on the ground, the floor does not wobble, and a stronger side cannot quietly drift the way a dumbbell does. Many people find them easier to perform cleanly for exactly that reason.
Because a flat hand puts your wrist into almost 90 degrees of extension under most of your body weight — more than a regular push-up. Turn your fingers slightly outward, spread them and press through the whole palm. If that is not enough, use push-up handles, parallettes, dumbbells or your fists to keep the wrist straight. A short wrist warm-up (circles, rocking on the hands) before the first set helps a lot.
They build the front of the shoulder — the cap you see from the front — and the triceps. Shoulder width comes mostly from the side deltoids, which pressing movements hit less than lateral raises do. The more vertical you get (feet elevated, wall handstand), the more the side delts join in. For the full picture, add a lateral raise with a backpack or water bottles and a pulling exercise for the rear delts.
Same movement, same muscles, different angle. The floor pike push-up loads about 66 percent of your body weight, the wall handstand push-up 100 percent. Between them sit three or four steps of raising your feet. Most people need six to twelve months of consistent training to move from clean floor pike push-ups to their first wall handstand push-up — and the elbow path you learn now is exactly what you will use there.
Aim for your nose to lightly touch the floor just in front of your fingertips, or to stop a finger’s width above it. Do not rest your head on the floor or push through the crown of your head — the bottom position is a pause, not a headstand. If you cannot reach the floor yet, that is a range-of-motion goal, not a failure: get a little lower each week.